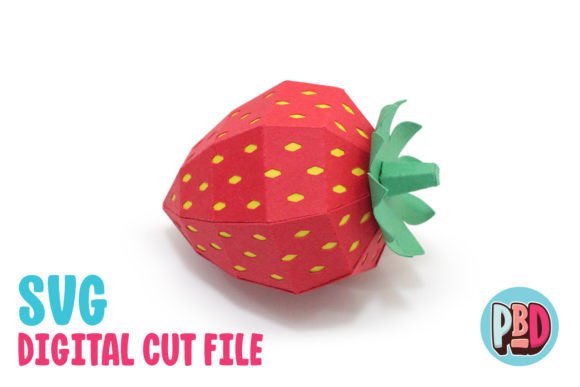
Strawberry 3D Papercraft: A Versatile Design for Creative Projects
If you are looking for a project that combines simple assembly with a striking visual result, the Strawberry 3D Papercraft design is an excellent choice. At first glance, it might seem like just another paper model, but its specific proportions and clean geometry make it surprisingly adaptable. Measuring just 2 inches wide by 2 inches deep and standing 3 inches high, this little strawberry is small enough to fit in the palm of your hand yet substantial enough to serve as a focal point for decor, party favors, or event styling.
This isn't about complex engineering or hours of tedious cutting. It is designed for efficiency and impact. Whether you are a hobbyist looking to fill an afternoon with a satisfying build or a small business owner needing unique merchandise, understanding how to utilize this digital asset effectively can save you time and elevate your final product. Below, we break down exactly what this download includes, who benefits from it most, and the practical steps you need to take to get the best results.
What Is Included in the Download?
When you purchase or download the Strawberry 3D Papercraft file, you aren't getting a single static image. You are receiving a comprehensive toolkit designed to work across different software ecosystems. The download comes as a single ZIP file containing three critical components:
- SVG Cut File: This is the primary format for modern cutting machines. It is vector-based, meaning it scales perfectly without losing quality.
- DXF Cut File: Included for users who rely on older or more basic software versions.
- PDF Instructions: A step-by-step guide to assembling the 3D structure, including scoring lines and glue placement.
Important Note: Before you attempt to open any of these files, you must extract them from the ZIP archive. Most cutting software cannot read directly inside a compressed folder. Extracting ensures that the file paths are correct and prevents loading errors.
Choosing the Right Software and Format
The success of your papercraft project often hinges on the software you use to prepare the cut files. Not all formats are created equal, and choosing the wrong one can lead to frustrating technical hurdles.
Why SVG Is the Preferred Choice
For most users, especially those using Cricut Design Space or Silhouette Designer Edition and above, the SVG file is the way to go. SVGs retain their mathematical precision, allowing for smooth curves and accurate scaling. If you plan to add text, resize the strawberry, or layer multiple colors, SVG provides the cleanest workflow. The cuts will be crisp, and the alignment of tabs and slots will remain intact.
Working with DXF Files
However, not everyone has access to premium software editions. If you are using Silhouette Basic Edition or other platforms that do not support SVG importation, the provided DXF file is your solution. While functional, DXF files behave differently. They tend to load more slowly in Silhouette Studio, and the resulting lines may appear less "clean" than their SVG counterparts. This doesn't mean the cut will fail, but it requires a bit more patience during the editing phase.
Critical Step for DXF Users: To ensure the file loads properly, you must adjust your preferences before importing. Follow these exact steps:
- Edit Preferences within Silhouette Studio.
- Select the Import DXF tab.
- Change the setting from "As-is" to "Centered".
Skipping this step can result in the design appearing off-center or scaled incorrectly, which makes assembly significantly harder. Remember, if possible, always default to SVG for the smoothest experience.
Material Selection Matters
The instructions explicitly recommend using medium cardstock. This is not a suggestion to be ignored. Thin printer paper will lack the structural integrity needed to hold the 3D shape, causing the strawberry to slump or collapse under its own weight. Conversely, heavy poster board may be too thick for the intricate tabs and slots, making assembly difficult and glue application messy.
Medium cardstock (typically around 65lb to 80lb cover weight) offers the perfect balance. It holds a crisp crease when scored, stands upright reliably, and accepts paint or markers well if you wish to customize the color beyond the standard red. Using the correct material directly impacts the professional look of your final piece.
Real-World Use Cases: Where Does This Fit?
Understanding the size (2x2x3 inches) helps us visualize where this papercraft shines. It is too large to be ignored, yet too small to dominate a space. Here is how different groups actually use this design.
Event Decor and Party Favors
For parents or party planners, this strawberry design is a low-cost, high-impact decoration. Imagine a summer fruit-themed birthday party. Instead of buying expensive plastic figurines, you create dozens of these strawberries. They can be used as table scatter, tucked into napkin rings, or glued onto cupcake toppers. Because they are 3D, they cast shadows and add depth to flat surfaces in a way that 2D cutouts cannot.
They also make excellent favor items. Fill clear cellophane bags with candy and top them with a completed strawberry papercraft. It feels personal and handmade, which resonates strongly with guests compared to mass-produced trinkets.
Educational Tools for Kids
Educators and homeschooling parents can leverage this project for STEM learning. The assembly process teaches spatial reasoning, fine motor skills, and following sequential instructions. You can integrate math by having students measure the dimensions (2x2x3) or calculate the surface area. For younger children, it serves as a tactile lesson in shapes and nature, reinforcing the concept of what a strawberry looks like in three dimensions.
Small Business and Digital Marketing
For bloggers, influencers, and small business owners, content creation is key. A stack of beautifully crafted strawberry papercrafts makes for compelling photography props. They are inexpensive to produce in bulk, reusable, and highly photogenic against pastel backgrounds or rustic wood textures. You can use them to illustrate blog posts about gardening, healthy eating, or DIY crafts.
Furthermore, entrepreneurs can sell these kits. By printing the PDF instructions and providing pre-cut cardstock (or selling the digital files themselves), you create a value-added product. The key here is presentation; show potential buyers how easy the assembly is and how professional the final result looks.
Seasonal Home Decor
While strawberries are associated with spring and summer, the bright red color can be repurposed. During the holiday season, these same models can be painted green at the top and hung as ornaments on a Christmas tree. They add a whimsical, non-traditional touch to holiday decor. In autumn, they can be paired with fall foliage arrangements to bring a pop of unexpected color.
Practical Considerations Before You Start
Before diving into the build, consider your end goal. Are you making one for display or fifty for a party? If quantity is your priority, investing in a electronic cutting machine (like Cricut or Silhouette) is essential. Hand-cutting 50 strawberries is feasible but time-consuming and prone to consistency errors. A machine ensures every tab is identical, speeding up the assembly process dramatically.
Also, think about finishing touches. Will you leave them plain, or will you add texture? Some crafters lightly sand the edges or apply a matte sealant to give the paper a slightly stiffer, more durable feel. Experiment with different shades of red cardstock to mimic the natural variation found in real fruit.
Finally, remember that while the digital file is free or low-cost, your time and materials have value. Treat the assembly process with care. Proper scoring (using a bone folder or empty ballpoint pen) before folding is the secret to sharp, professional-looking creases. Rushing this step leads to rounded, sloppy folds that detract from the overall aesthetic.
The Strawberry 3D Papercraft is more than just a cute shape; it is a flexible tool for creativity. Whether you are decorating a classroom, launching a new blog series, or simply enjoying a quiet afternoon crafting, this design offers a rewarding challenge with a tangible, beautiful outcome. By selecting the right format, preparing your software correctly, and choosing appropriate materials, you ensure that your project is both enjoyable to make and impressive to behold.